How to Store Worm Castings Without Losing Nutrients
If you want to store worm castings without wasting the good stuff, the first step happens before they ever go into a bag or bin. Castings should be finished and fairly uniform. They should look dark, loose, and soil-like, not muddy, slimy, or packed into wet clumps. If they still contain obvious chunks of food, a lot of shredded bedding, or a bunch of active worms, they are not really ready for storage yet. That matters because unfinished material keeps breaking down fast, which means more heat, more moisture swing, and more microbial imbalance while it sits.
Freshly harvested vermicompost storage goes wrong most often because people store it too wet. Wet castings turn dense, lose airflow, and can shift from earthy to sour in a hurry. Spread them out for a short curing period in a shaded, breathable spot indoors before packing them away. Not bone-dry. Just drier than “fresh from the bin.” Think wrung-out sponge moving toward fluffy garden soil. If you squeeze a handful and it sticks together like clay, it needs more air time. If it falls apart easily and smells clean and earthy, you’re in the safe zone.
Use Breathable Storage, Not Airtight Containers That Smother Microbial Life
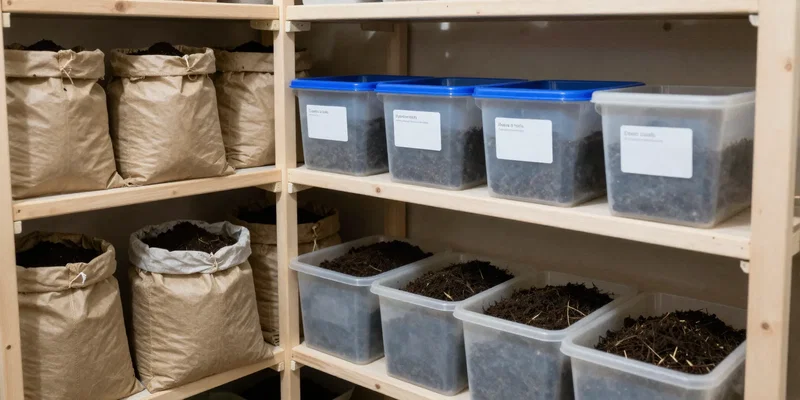
Here’s the thing: worm castings are not just dirt. A big part of their value is biological. If you seal them up tight like leftovers, you can create the exact conditions that make them go flat, sour, or anaerobic. For most home growers, the best containers are simple and breathable: heavy paper bags, cloth grow bags, or plastic totes with air holes and a loose lid. You want the castings protected from drying out too fast, but still able to breathe.
Airtight buckets are tempting because they look tidy. I wouldn’t use them unless the castings are very stable and you open the container regularly. Even then, they are not my first choice. A breathable setup gives you more margin for error, especially after an indoor compost harvest when material often holds more moisture than you think. If you use bags, don’t pack them hard. Keep the fill loose. Compression reduces airflow and creates pockets where moisture can build. Good vermicompost storage is boring on purpose: stable temperature, moderate moisture, no pressure, and enough oxygen that the biology doesn’t crash.
Keep Moisture in the Middle, Because Too Wet and Too Dry Both Cause Problems
People talk a lot about keeping castings moist, and that’s true up to a point. But soaked castings are worse than slightly dry ones. When storing worm castings, you’re aiming for moderate moisture that supports microbial life without creating a swamp. A practical rule: they should feel cool and soft, but not wet enough to leave residue on your palm. If they dry a little during storage, you can still use them effectively in potting mixes, top-dressing, or teas. If they go anaerobic from excess moisture, the quality drop is much harder to fix.
Check stored castings every couple of weeks if you plan to keep them for a while. Open the container, fluff them lightly with your hand or a scoop, and pay attention to smell and texture. Earthy is good. Sour, swampy, or ammonia-like is bad. If they feel too wet, spread them in a thin layer for a few hours in a cool shaded indoor space, then repack loosely. If they seem too dry, don’t drench them. Mist lightly and mix. The goal is consistency, not rescue. Worm castings nutrients hold up best when the material stays biologically alive and physically stable, and moisture control is the center of that whole equation.
Store Them Cool, Dark, and Out of Direct Heat if You Want Nutrients to Last
Temperature matters more than a lot of gardeners realize. If your castings sit in a hot garage, a sunny porch, or next to a furnace room wall, you’re asking for faster biological decline and moisture swings. The best place to store worm castings is cool, dark, and steady. A basement shelf, insulated utility room, pantry-like closet, or shaded indoor grow area works well. You do not need refrigeration. You do need to avoid repeated heat spikes.
Light itself isn’t the main villain, but light usually comes with heat and drying. That’s why indoor compost harvest material does better in opaque containers or tucked-away storage rather than clear bins in a bright room. If you’ve gone to the trouble of producing quality castings, don’t leave them where afternoon sun can bake them. Also, skip freezing if you can help it. Some people do it for convenience, but it’s not ideal when your goal is preserving active biology. Worm castings nutrients are not just NPK numbers on paper; part of the benefit comes from microbial activity and humus quality. Gentle storage protects both better than extreme cold or heat.
Know the Real Shelf Life and Use the Best Batch First
A lot of sellers advertise long shelf life, and technically castings can remain useful for quite a while. But “still usable” and “at peak quality” are not the same thing. If you care about getting the most from them, use your freshest batch first. For home storage, I’d treat a few months as the sweet spot for best biological quality, especially if the castings are intended for seedlings, transplants, or living soil mixes. They usually still have value beyond that, but the closer you use them to harvest, the better.
Label every batch with the harvest date. Seriously. It’s such a simple habit and it saves a lot of guesswork. Rotate older castings to top-dressing or outdoor beds, and keep the freshest material for more sensitive uses. If you produce enough vermicompost to store in volume, break it into smaller containers rather than one giant tote. That way, you only expose one batch at a time to air and handling. It also makes it easier to notice if one container has gone too damp or too dry. Good vermicompost storage is less about one magic product and more about small, sane habits that protect quality over time.
Watch for the Red Flags That Tell You Stored Castings Need Help
Stored castings don’t need constant fussing, but they do deserve a quick inspection now and then. The warning signs are pretty easy to spot once you know them. Bad smell is the big one. Healthy castings smell like forest soil after rain. If the odor turns sour, rotten, musty, or sharp, oxygen and moisture balance are off. Another red flag is hard compaction. Castings should stay loose enough to crumble. If they’ve formed dense slabs or sticky lumps, they were probably stored too wet or packed too tightly.
You might also notice white fuzz or patches of fungal growth. That isn’t automatically disastrous; some fungal activity can be normal in organic material. But heavy growth, combined with excess moisture or off smells, means conditions have drifted. Fix the environment before you use the batch everywhere. Spread it out, let it breathe, break up clumps, and restore a more even moisture level. If the castings have simply dried down, they’re usually still fine for garden use, especially mixed into soil. The real trouble starts when storage conditions push them into anaerobic decay. Avoid that, and you’ll keep far more of the value you worked to create in the first place.